A while ago, I began brainstorming ideas of what to fill this empty wall space above the TV in our new bedroom...

I wanted to start introducing a few nautical touches—without going overboard—simple and classic.
An anchor was the first thing that popped into my head. But where would I get one? What would it be made out of? What would it cost?
The answer came to me from Pinterest (of course). I stumbled upon a salt dough ornament and a light bulb went off. Why not make a large-scale salt dough sculpture?
I've never actually worked with salt dough (deprived as a child, apparently) so I googled around for the most perfect, long lasting recipe that wouldn't break as soon as it came out of the oven.
I ended up using this one—although they are all pretty much the same—water, salt, flour. I doubled mine to make sure I had enough.

I also added a bit of vegetable oil which is supposed to make it a little more pliable.

After thoroughly stirring, I had myself a big hunk of dough.

But back to the sculpture. Aside from the anchor, I wanted to add one more item to balance things out.
I decided on this simple quote, which would be carved into a round plaque:

Once my templates were designed and printed, I cut them out with my Xacto knife:

I figured I'd mold my base and then cut my shapes out again with the Xacto knife.
First up—the anchor.
The goal here was to make this look handmade and somewhat abstract—because let's face it, I'd never get this thing perfectly chiseled by hand.
I built up a mound in the general shape of the anchor and laid my template over it:

Then I cut around the outside...

I wanted it to look more organic and less rigid, so I smoothed around the edges.

This stuff isn't the easiest thing to work with in large chunks. You can't really add pieces on and smooth it out without stretching or squishing something else. It took me a solid hour or so to make it look like the photo above.
When I determined it was as good as it was going to get, I moved onto my next sculpture.
I used the leftover dough from my anchor and rolled it down so it was around a half inch thick or so.

Then I placed my template over it and began to carve. But it didn't work out so well... I think the dough is a too flimsy for small details.
After the first word fail, I started experimenting with polka dots using a skewer stick.

Once I decided that would be a better option, I rolled it back up and started over.
This time I cut out my round shape first, using the lip of a bowl:

Then I placed my template over it and started pokin' holes.


For a little more interest, I gave it some texture around the edges with my skewer sticks...

Ta-da.

I carefully transported the plaque over to the oven to join the anchor.

But I still had a little dough leftover.
Not wanting to waste it, I walked around the house trying to find something else to sculpt. And I found the perfect thing: a starfish!
I grabbed it off the mantel so I could recreate it as closely as possible.

This was 100x easier than the anchor and plaque. The skewer sticks were perfect hole makers again.

I threw the starfish in the oven and let them bake... for days. At 200' it's supposed to take several hours, but my sculptures were so thick that even after a couple days, they were still a little soft on the back.
I finally got tired of waiting and brought them into the garage to get ready for paint.
The anchor had some rough flaky edges, so I very carefully took some sandpaper to it (60 grit)

It smoothed out pretty nicely.

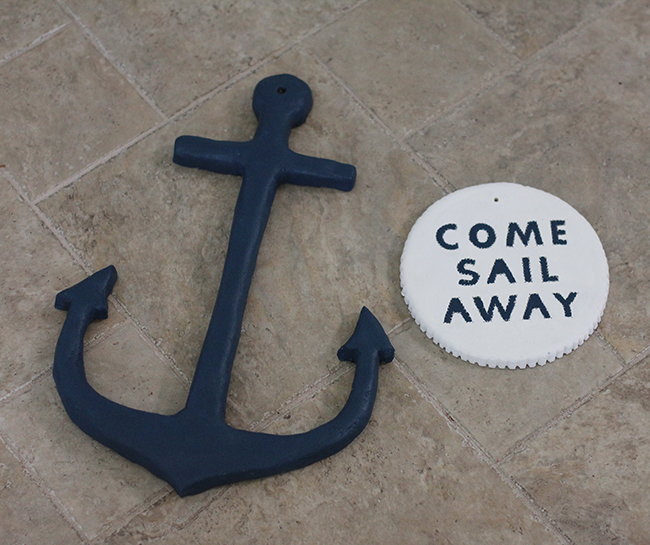
Once dry, it was time for paint!
I pulled out some leftover gray I had from our sunroom mirror and applied a thick coat.

But once I brought it into our room and held it up against the gray walls, I realized the grays clashed and had to formulate a Plan B.

Plan B was custom navy blue paint, made from some acrylic blue and black I had lying around.
A couple thick coats did the job.
Next up was the plaque.

I opted for a soft white with navy blue inside the letters so they'd be visible from across the room.
Word to the wise—salt dough doesn't really get along with paint. If the surface isn't completely dry when you try to apply a second coat, the paint will come right off.

The paint also filled my dots, boo. Nothing I could do about that because the paint would pull off when I tried to re-dot them. Oh well.
The starfish would also be painted a soft white. I went to pick it up, and this happened...

Yikes... more fragile than I thought!
And then I accidentally set the plaque on it and this happened:

I realized there were some cracks that had baked into it, weakening some areas. Maybe my fault. I was just about to trash it when I brought out the hot glue gun in a last ditch attempt...

Totally worked. Stronger than before.

Can't even tell from the front.
I ended up giving the starfish to a friend, and here's how my new wall decor turned out:
Only thing left to do was hang them! I threaded some twine through the holes I had made in the top before baking, tied them around some special drywall screws, and here they are now:


What do you think? Not bad for materials I had lying around the house, right? I love the extra touch the bows add.

Salt dough has opened up a whole new world of possibilities for me. I find myself looking around wondering what else I can just make myself instead of having to hunt down and purchase in the perfect size/shape/color. How have I lived without it this long?! There will definitely be more of this in my future.
Anyone else inspired to make something? Try it—it's fun!
Be back next time with another office update...

Linking up with Suburbs Mama and DIY Showoff!
An anchor was the first thing that popped into my head. But where would I get one? What would it be made out of? What would it cost?
The answer came to me from Pinterest (of course). I stumbled upon a salt dough ornament and a light bulb went off. Why not make a large-scale salt dough sculpture?
I've never actually worked with salt dough (deprived as a child, apparently) so I googled around for the most perfect, long lasting recipe that wouldn't break as soon as it came out of the oven.
I ended up using this one—although they are all pretty much the same—water, salt, flour. I doubled mine to make sure I had enough.
I also added a bit of vegetable oil which is supposed to make it a little more pliable.
After thoroughly stirring, I had myself a big hunk of dough.
But back to the sculpture. Aside from the anchor, I wanted to add one more item to balance things out.
I decided on this simple quote, which would be carved into a round plaque:
Once my templates were designed and printed, I cut them out with my Xacto knife:
I figured I'd mold my base and then cut my shapes out again with the Xacto knife.
First up—the anchor.
The goal here was to make this look handmade and somewhat abstract—because let's face it, I'd never get this thing perfectly chiseled by hand.
I built up a mound in the general shape of the anchor and laid my template over it:
Then I cut around the outside...
I wanted it to look more organic and less rigid, so I smoothed around the edges.

This stuff isn't the easiest thing to work with in large chunks. You can't really add pieces on and smooth it out without stretching or squishing something else. It took me a solid hour or so to make it look like the photo above.
When I determined it was as good as it was going to get, I moved onto my next sculpture.
I used the leftover dough from my anchor and rolled it down so it was around a half inch thick or so.
Then I placed my template over it and began to carve. But it didn't work out so well... I think the dough is a too flimsy for small details.
After the first word fail, I started experimenting with polka dots using a skewer stick.
Once I decided that would be a better option, I rolled it back up and started over.
This time I cut out my round shape first, using the lip of a bowl:
Then I placed my template over it and started pokin' holes.
For a little more interest, I gave it some texture around the edges with my skewer sticks...
Ta-da.
I carefully transported the plaque over to the oven to join the anchor.
But I still had a little dough leftover.
Not wanting to waste it, I walked around the house trying to find something else to sculpt. And I found the perfect thing: a starfish!
I grabbed it off the mantel so I could recreate it as closely as possible.
This was 100x easier than the anchor and plaque. The skewer sticks were perfect hole makers again.
I threw the starfish in the oven and let them bake... for days. At 200' it's supposed to take several hours, but my sculptures were so thick that even after a couple days, they were still a little soft on the back.
I finally got tired of waiting and brought them into the garage to get ready for paint.
The anchor had some rough flaky edges, so I very carefully took some sandpaper to it (60 grit)
It smoothed out pretty nicely.
Once dry, it was time for paint!
I pulled out some leftover gray I had from our sunroom mirror and applied a thick coat.
But once I brought it into our room and held it up against the gray walls, I realized the grays clashed and had to formulate a Plan B.
Plan B was custom navy blue paint, made from some acrylic blue and black I had lying around.
A couple thick coats did the job.
Next up was the plaque.
I opted for a soft white with navy blue inside the letters so they'd be visible from across the room.
Word to the wise—salt dough doesn't really get along with paint. If the surface isn't completely dry when you try to apply a second coat, the paint will come right off.
The paint also filled my dots, boo. Nothing I could do about that because the paint would pull off when I tried to re-dot them. Oh well.
The starfish would also be painted a soft white. I went to pick it up, and this happened...
Yikes... more fragile than I thought!
And then I accidentally set the plaque on it and this happened:
I realized there were some cracks that had baked into it, weakening some areas. Maybe my fault. I was just about to trash it when I brought out the hot glue gun in a last ditch attempt...
Totally worked. Stronger than before.
Can't even tell from the front.
I ended up giving the starfish to a friend, and here's how my new wall decor turned out:
Only thing left to do was hang them! I threaded some twine through the holes I had made in the top before baking, tied them around some special drywall screws, and here they are now:
 |
| We relocated the cable box to the side of the TV... much better! |
What do you think? Not bad for materials I had lying around the house, right? I love the extra touch the bows add.
Salt dough has opened up a whole new world of possibilities for me. I find myself looking around wondering what else I can just make myself instead of having to hunt down and purchase in the perfect size/shape/color. How have I lived without it this long?! There will definitely be more of this in my future.
Anyone else inspired to make something? Try it—it's fun!
Be back next time with another office update...
Linking up with Suburbs Mama and DIY Showoff!
0 comments:
Post a Comment