Now that it's all over, I'm relieved to say that it went so much better than expected—and I hope this recap can inspire others to tackle it themselves!

First, the basics. There are a few options to choose from when planking a wall or ceiling.
Option 1 is the easiest and most cost effective—using a pre-made sheet of beadboard or wall paneling from the hardware store, like we did in my last studio remodel:

Option 2 is also cost effective and what you'll find most on Pinterest these days—getting a thin sheet of wood or some sort of wood composite material and having it cut into strips. We did this in our master bedroom and I loved the results:

Option 3 is the real deal—using tongue and groove wood planks, like Ben & Amanda did in their bathroom reno:

While options 1 and 2 are quite a bit cheaper and can still turn out great depending on the look you are going for, I decided to go with real tongue and groove boards this time. Lowe's also sells packs of "V-groove" panels, but they are narrow and I wanted something more substantial.
Our last house was all about DIY on a budget—achieving the look for as little time/money/effort as possible, but as I mentioned in a previous post, I plan to take it up a notch in this house. Sometimes that means splurging a little on important details which I believe will be worth it in the long run.
Just because I was prepared to spend some money doesn't mean I wasn't going to shop around for the best deal, though!
I found this unfinished tongue and groove pine at Lumber Liquidators for $1.09/sf:
I went with the longest size boards possible (8ft) to reduce the amount of seams.
Our kitchen ceiling is around 420 sq ft, but I ended up getting extra so I could do the dining area wall, my studio, and a wall in the living room (and hopefully have enough leftover for an accent wall in our bedroom).

The grand total after tax was $1183.73, but that didn't include shipping which was an extra $370 (um, no thanks!) Instead of having it delivered, I opted to pick it up at the nearest store. Unfortunately it was 60 miles away, so I had to take an afternoon off to rent a moving truck and pick it up. Another $150 in gas/rental fees later, and our wood was safely home:

Oh yeah, and if you are thinking about ordering from them, plan ahead! I placed the order on 12/12 and the wood didn't get to the store until this past Friday (1/17). The delay set us back a week so now we're scrambling to get everything completed before the cabinet installation and our move in date.
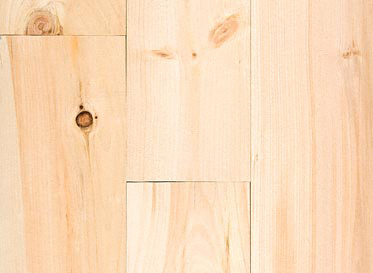
Anyway, back to the wood. Here's something I never knew until recently—tongue and groove is double sided so you can use one for hardwood floors, and the other is meant for paneling walls and ceilings. Here's the flat side for floor installs:

And here's the tongue and groove side (this is the side that will be exposed):

When researching how to do this, I didn't find a lot online. There were several plank wall tutorials—most being option 2 (plywood cut into strips, which I had already done) but there were very few for tongue & groove. If you're looking to tackle this project, here are the ones I found most helpful and bookmarked:
A detailed step by step for install (no photos)
Here's a video (old school but useful)
This tutorial from Sawdust Girl
Hopefully this post will contribute to the pool of resources for those of you about to take this project on. Ready? Let's get started.
Here's what you'll need:
Tongue and groove boards (mine were 3/4" thick, 5 1/8" wide, and 8' long. I like pine because it's lightweight and easy to work with. Make sure to get extra for cut and damaged boards).
A nail gun & nails (I wouldn't even attempt this with a hammer, it will take forever. I used 2" long 18 gauge finishing nails, though 16 gauge will be a bit stronger)
Liquid Nails (not necessary unless you aren't nailing into studs, but a good idea for ceilings regardless)
Miter Saw (or a regular saw if that's all you have—make sure the blade is long enough to cut your board width!)
Jigsaw or table saw (we ended up using both)
Note: unless your boards are really short, this is a two person job.
First you need to plan it out. Our ceiling is just under 24 feet long at the widest point:

Since my boards were 8 feet long, I decided to use three even rows and hide the seams with a beam running perpendicular (so there would be three beams total). Most people aren't going to add beams, so you'll just want to cut your boards at various lengths to stagger the seams. I prefer the seams to blend in as much as possible, so I would caulk and sand afterwards (I'll be taking this approach with the back wall since it is slightly wider than 8 feet).
Before you start, you'll need to mark your joists. We bought a chalk line and had them all marked for drilling our light and speaker holes:

It's a little difficult to see, but there are light blue lines running throughout. Our ceiling was a little weird because the beams ran horizontal in the front and perpendicular in the back. This meant that most of the boards up front wouldn't be nailed into a stud, which is where liquid nails comes in...

For our first board, we decided to start in the back corner of the room.
We lined up the groove/flat side to the edge of the wall so the tongue was exposed, and shot a couple nails through on each end and along the edges. Luckily, it didn't fall!

To allow room for expansion, you'll want to leave around a half inch of space between the walls. Our wood didn't sit indoors to acclimate to the environment so this was especially important.
The next board locked in place quite easily. We shot a few more nails into the edges and several along the tongue. This part is important—to avoid having to fill a million tiny nail holes, you want to angle the gun inward at a 45 degree angle on the tongue:

The blue chalk line represents a joist, which you'll want to make sure to hit (unless there aren't any that cross your board).
Since the tongue will be covered by the groove of the next board, this will ensure all of your nails are hidden. It takes some time to get the hang of it, but after about 100 boards I finally started to look like a pro!
Moving along...

Back to those holes we cut. Many of you won't do it this way because you'll already have lights in your ceiling, but we had none and wanted to add recessed lights and speakers, so first we had to plan and cut out all of the locations.
When we came across a board that covered the holes, we stapled a tag to the top of it (labeled as "Speaker" or "Light". Then we installed the board as normal:

After the plank ceiling was finished, Brad could go up in the attic, locate the tags, and drill a hole down through the center. From below, I would mark the hole location, and then Brad would come back down and drill through the planks using the correct size hole saw to fit the light fixture. With the drywall holes cut out extra large, that would give us enough room to make adjustments if they didn't line up exactly.
The reason we couldn't just drill through the planks and drywall at the same time is because the tabs on the inside of the lights and speakers are made to grip onto 1/2" thick drywall only. The planks and drywall together are too thick, so we had to cut the drywall away so the tabs would attach to just the planks. Make sense? I'll explain this more in just a second (with photos).
After you get the first board up, it's pretty much just rinse and repeat.

Once we got to the back of the room, the joists started running the other way so we were able to nail into them. We used two nails on the edges and one where the board met each stud (on the tongue).
Making progress, 5 inches at a time...

After a couple hours, we made it to the end of the first row!

For the second row, we just made sure the edges were lined up with the first row.

Sometimes the board slid right in effortlessly and lined up perfectly on both sides. Other times it was a little warped and needed some persuasion. To avoid damaging the groove, we used a scrap piece to attach to the end and hammer it in. Usually that was all it took to nudge right in.

Other times it was a little more stubborn, and we'd need to use a pry bar to wedge it in place while we nailed.

The great thing about this wood is that it's soft which means very forgiving. I can't tell you how many nails we didn't angle in correctly (aka straight up into the ceiling, in the way of the next board), but we were able to tap the board right in with a hammer. It also helped that the nails were thin and easily bendable, so if we didn't line it up just right the first time, we could push it into place and nail it again.
Eventually we reached the back wall. This time there was an issue though.

As you probably know, most walls and ceilings aren't built completely level, so by the time you get to the back of the wall, you'll be lucky if everything is aligned perfectly.
We kept this in mind and started measuring the distance to the back wall on each side about halfway through so we could make small adjustments on either side to stay parallel. But for whatever reason, we ended up with a 1" gap on one end, and a 2" gap on the other end.
For our last piece, we measured and marked our gap on a board and cut it out with a jigsaw:

It didn't matter at all if the line was cut straight since it would be covered with a piece of trim along the edge.


Two rows down, one to go!

Same process here, except we had to trim down about 30" off the length of the first section since the wall was shorter.

Then we came across an obstacle—we'd have to notch out a piece to wrap around this wall. It was simple, really—we just measured where the wall came out, traced it onto our board, and cut (again with the jigsaw—though you could just as easily use a table saw):

And again, since this will all be hidden, nothing has to be exact. It was pretty dang close anyway though:

As we were nearing the home stretch, I noticed the ceiling was off...

...like, way off. Not straight at all.
It became an issue when I saw how bad the ends of the boards were bowed down.

The main reason this is an issue is because I plan to install a beam there, and it won't sit flush up against the ceiling if it's wavy.
We grabbed some long screws and Brad tried to pull them back up as tight as he could.
 |
| That gap will be hidden by the beam, don't worry! |
We weren't able to get them completely level, but the screws did help a lot. I plan to add a small piece of trim after the beams are up to hide any gaps.
After clearing that last hurdle, we made it to the very end—and this time we got the spacing right! We ripped down a 2.5" piece using a table saw and nailed it into place for the final piece.

And then we were able to step back and admire our hard work...


The next day we were back at the house to install the lights.
(forgot my memory card... cell phone pics coming up)
First, Brad went into the attic to find all the green tags we had stapled to the top of the boards. He then drilled a hole in the center of the opening we cut, and I marked it from below so we could easily spot the locations.

Then, he came back down and drilled a hole using an arbor and hole saw set to the same size as our lights.

It was tougher than cutting through drywall, but since the wood is soft it went pretty smoothly.
Then he grabbed the wire and pulled it through.

Test fit—success!

The speaker holes are quite a bit larger and we didn't have a hole saw to fit, so Brad cut them out by hand using a jigsaw (first I traced the opening onto the ceiling using the template that came with the speakers):

There's a lip that covers the opening, so perfectly smooth circles aren't necessary.

Worked again!

In total, we have 13 recessed lights, 3 pendant lights, and 4 speakers.

We didn't install any of them yet because we have to paint the ceiling first. I briefly considered leaving it bare wood, but ultimately decided that a nice bright white to keep it open and airy would be our best bet.
And now you're up to date with our kitchen! Well, actually, that's a lie. In the middle of writing this post I took a break to install planking on the dining room wall... here's a sneak peak I posted on instagram a few hours ago:

Ever since our plank wood arrived it has been non-stop action in this house, and it's going to be like this for a while. Here's what's on schedule for the week...
Wednesday: Buy and install trim for dining wall, finish spackling and sanding windows and dining wall, caulk all seams.
Thursday: Paint kitchen ceiling, plank wall, and window trim
Friday: Finish painting, Kitchen cabinets are delivered, start paneling the studio
Saturday: Road trip to Ikea! (& staying with family in San Francisco over the weekend)
Sunday: Finish paneling the studio
Monday: Kitchen cabinets are installed, start assembling Ikea cabinets (bench seating, pantry and bar area)
I'm assuming the Ikea assembly will take a few days (just for the kitchen—I'm buying a ton of other stuff as well). By the end of next week I hope to have the kitchen, dining area and studio completely paneled and painted and all of the kitchen cabinets (including the ones from Ikea) assembled. Our goal is to move in by next Saturday, so hopefully we can stick to that. It's going to be a loooong week...
I'll be back sooner than normal with an update after everything is painted. Feel free to ask in the comments if you have specific questions about the plank wall process—I'll cover more of it when I review the plank wall install in my next post. Stay tuned!

Excellent blog. I used Pre-Finished Paneling from Log Home Shoppe, and installation was quick while achieving a smooth, professional look instantly.
ReplyDeleteFantastic insights! For homeowners in the USA, Wood Workers Shoppe also provides high-quality Tongue and Groove Ceiling Pine , perfect for creating cozy, rustic, and elegant cabin-style ceilings effortlessly.
ReplyDeleteReally enjoyed the insights on Tongue And Groove Pine Ceiling . Log Home Shoppe has also amazing materials that make achieving this look simple and high-quality.
ReplyDeleteGreat blog! Your explanation of ceiling upgrades was really helpful. I recently exploredTongue and Groove Ceiling Pine at Woodworkers Shoppe, and it truly creates a warm, perfectly finished rustic look.
ReplyDeleteAwesome blog, I learned a lot about wood interiors. Considering Tongue and Groove Ceiling Pine from Woodworkers Shoppe as it provides a classic look and easy installation for ceilings projects.
ReplyDeleteLoved reading this! A Tongue And Groove Pine Ceiling adds rustic elegance and natural beauty to any room. Log Home Shoppe has some impressive wood solutions worth exploring.
ReplyDelete