
But, at nearly $2000, it's not even in the same universe as our price range, so, I knew that I would have to come up with a way to build my own version if I really wanted it. So, first thing to do, find some castors that I liked that were cheap or free. I found an industrial set like in the photo but they were too expensive, as well. Then hubby came home the other day with a set of castors that he found, I couldn't believe how perfect the timing was. I was super excited to get started on the piece and he was super excited for me to get finished. :) Time for more barn wood.......
I started by prepping all the planks, which consisted of hosing them down, scrubbing with a brush, soap and water, letting them dry a few days in the sun, then sanding down completely with a palm sander, rinse again and let dry in the sun. Then I took 220 grit sandpaper and lightly sanded the wood to give it a smooth finish. I decided what size I wanted the shelf to be, 5' x 3' with a 12 inch depth, and cut all my boards accordingly. Here's what I had after all that. Beautifully salvaged wood. (And crunchy brown grass......please rain.)
 The small planks in the photo are the lip that I attached to the front of each shelf to create the illusion of a thicker plank and provide a nice finish. For the steel rods like in the inspiration photo, I used 1/2 inch wood dowels that I spray painted oil rubbed bronze. I bought corner brackets at the hardware store and spray painted those as well, to create the same detail as the Restoration Hardware piece. The castors had a good bit of surface rust, so I sanded that off with steel wool. Hardware is all ready!
 I have to say that this was a hard project to work on. Mainly because it was 100 degrees both days I worked on it and also because the wood weighs a ton. The first day, I just wasn't feelin' it and had to sit and stare at the pile for a long time to figure out how I wanted to do it. After a couple of hours, everything started coming together and I got busy and didn't take anymore photos till I was finished. The second day I worked on it, I was so happy to have my hubby home, instead of working, to give me a hand. It was HEAVY. And hot. And I just wanted to get it finished so we would stop melting. Here's what I came up with.....
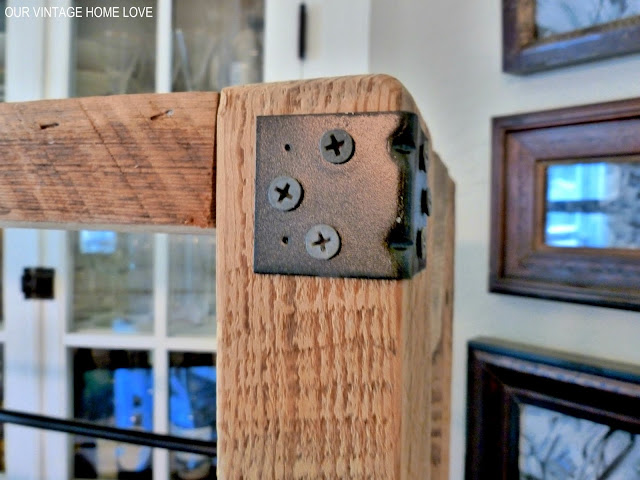
 I tried to create the same detailing as the piece in my inspiration photo. Corner brackets....
 "Steel" rods......
 And castor wheels......
 It's not exactly like the other piece but I'm pretty proud of it and my hubby LOVES it. THAT makes me so happy.
 I can't wait to put it in the room and fill it with his special finds. He found a few really cool things at an auction this week to put on the shelf, one of which I'm going to blog about this week because it is so cool, that I was even surprised by how much I liked it. Bet you'll never guess what it is! :)
So, that's it! I'm still picking up other things for the room here and there and can't wait to put everything together and surprise him! Stay tuned for that. I'm so excited to be doing this for him. And he is so excited that he's like a kid in a candy store!
Have a great day!
P.S. Almost forgot, total cost to build the shelf, about 10 bucks, for the cost of 4 wood dowel rods and 2 brackets. Everything else was either found or a supply we already had. Gotta love that!!
I started by prepping all the planks, which consisted of hosing them down, scrubbing with a brush, soap and water, letting them dry a few days in the sun, then sanding down completely with a palm sander, rinse again and let dry in the sun. Then I took 220 grit sandpaper and lightly sanded the wood to give it a smooth finish. I decided what size I wanted the shelf to be, 5' x 3' with a 12 inch depth, and cut all my boards accordingly. Here's what I had after all that. Beautifully salvaged wood. (And crunchy brown grass......please rain.)


So, that's it! I'm still picking up other things for the room here and there and can't wait to put everything together and surprise him! Stay tuned for that. I'm so excited to be doing this for him. And he is so excited that he's like a kid in a candy store!
Have a great day!
P.S. Almost forgot, total cost to build the shelf, about 10 bucks, for the cost of 4 wood dowel rods and 2 brackets. Everything else was either found or a supply we already had. Gotta love that!!
0 comments:
Post a Comment